Szélszívás teszt
Lapostető útmutató – 4. rész
Az előző részekben a lapostető tervezésének alapjairól, a lapos- és magastető közötti különbségekről, a lapostető felépítésének módjairól és az előtervezésről volt szó.
A szélszívás teszt eredménye fontos információ lehet az előtervezés elkészítéséhez. De mit is jelent ez a teszt, és milyen információkat adhat nekünk? A szélszívó teszt a szél által a tetőrendszerekre ható terhelést vizsgálja. A mechanikailag rögzített tetőrendszerek esetén a meghibásodási terhelést az EAD illetve a DIN 16002 szabványban foglaltak szerint határozzák meg.
A szélszívás teszt eredménye fontos információ lehet az előtervezés elkészítéséhez. De mit is jelent ez a teszt, és milyen információkat adhat nekünk? A szélszívó teszt a szél által a tetőrendszerekre ható terhelést vizsgálja. A mechanikailag rögzített tetőrendszerek esetén a meghibásodási terhelést az EAD illetve a DIN 16002 szabványban foglaltak szerint határozzák meg.
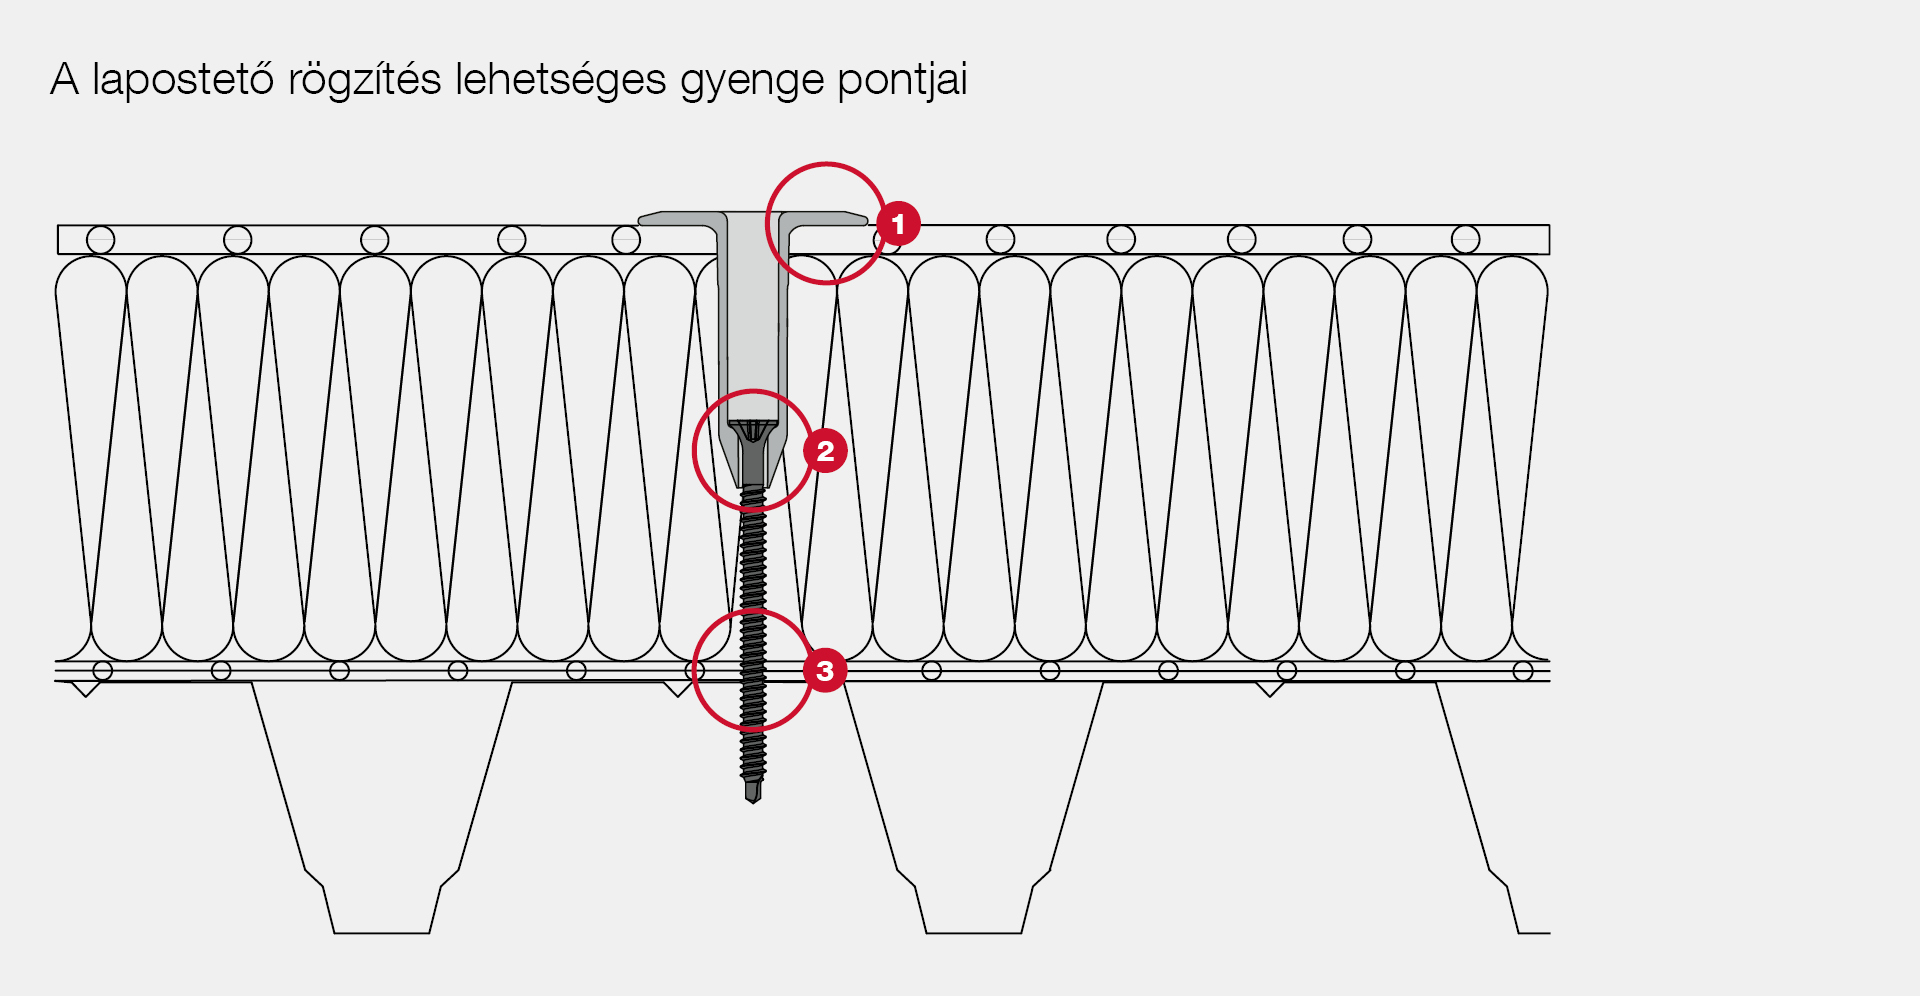
A lapostető-rögzítés lehetséges gyenge pontjai
A szélszívó tesztnél három lehetséges gyenge pont, illetve forgatókönyv lehetséges, amelyek a rendszer meghibásodásához vezethetnek.- A tetőszigetelő lemez és a tartótányér közötti kapcsolat. Általában ez a leggyengébb pont. A meghibásodás nagymértékben függ a tetőszigetelő lemez mechanikai tulajdonságaitól.
- A tartótányér és a csavar közötti kapcsolat. A meghibásodás nagymértékben függ a tartótányér anyagától és a csavarfej geometriájától.
- A rögzítőelem és az aljzat közötti kapcsolat
A teszt felépítése
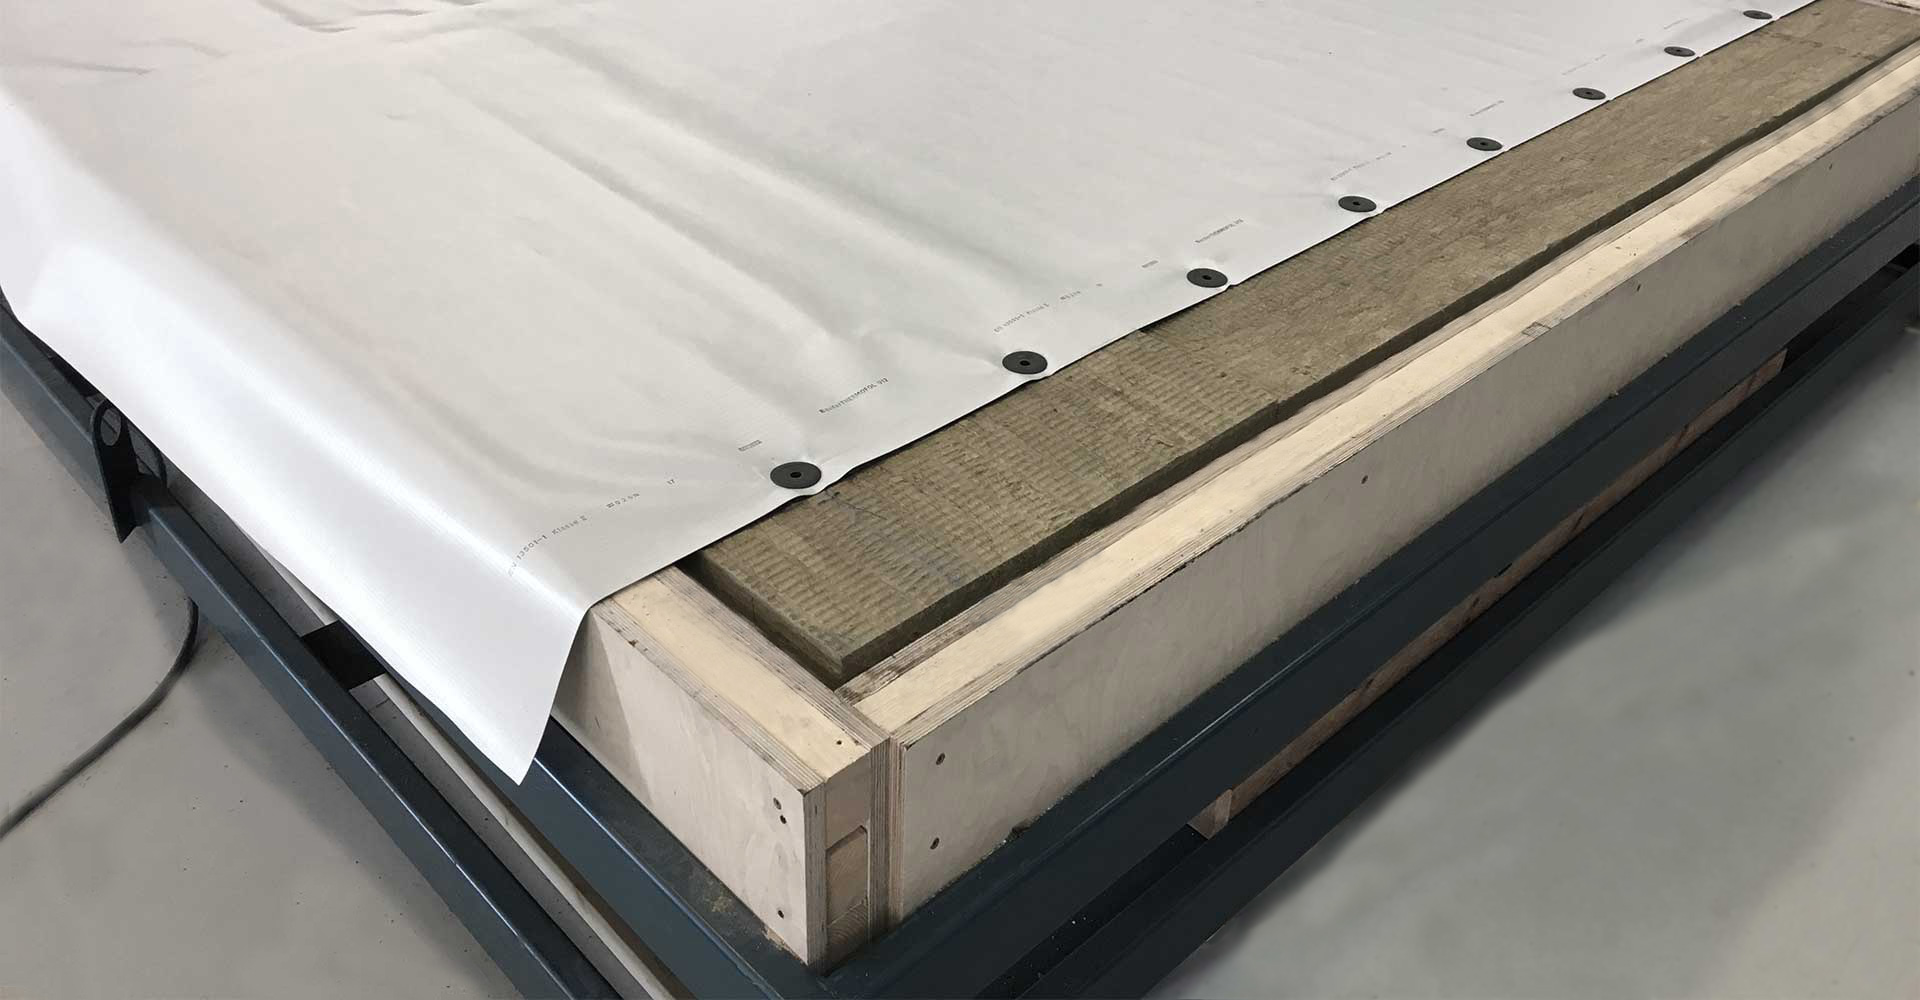
A tesztet egy mintatetőn végzik el. A tesztfelületet fakeret veszi körül. A keret mérete megegyezik a vizsgálóbúra méretével, amelyben később szélszívás jön létre. Ezen a kereten belül egy trapézprofil található. Felette 10 cm-es szigetelés található. A szigetelő lemezt a hőszigetelésre helyezik és az adott raszter szerint rögzítik.
Az acél trapézprofil anyagát és a hőszigetelést úgy választjuk meg, hogy az a leggyengébb minőségű és legkedvezőtlenebb tulajdonságú legyen. Ez biztosítja, hogy a vizsgálati eredmények a nagyobb szilárdságú trapéz acéllemezekhez és a nagyobb nyomószilárdságú hőszigetelésekhez is felhasználhatóak legyenek. A mintatető elkészítése és a vízzáró lemez átfedésének hegesztése után a tesztet a vizsgálóbúra alatt kell elvégezni. Ebben a búrában mesterséges széllökések keletkeznek. Ezek a vízzáró lemezek felfelé íveléséhez vezetnek.
A széllökések száma, gyakorisága és intenzitása előre meghatározott. Egy széllökés 8 másodpercig tart és egy fázisból áll, amelyben a szélszívás felépül. Ezt 2 másodpercig tartják, majd újra csökkentik. Ekkor azonnal megindul a következő széllökés. Egy ciklus 1.415 széllökés után ér véget. Egy cikluson belül az erő lassan felépül. A tesztet addig végezzük, amíg a rendszer meghibásodik. Az EAD vagy DIN 16002 szabvány szerinti szélszívó teszt akár három napig is eltarthat.
Eredmények
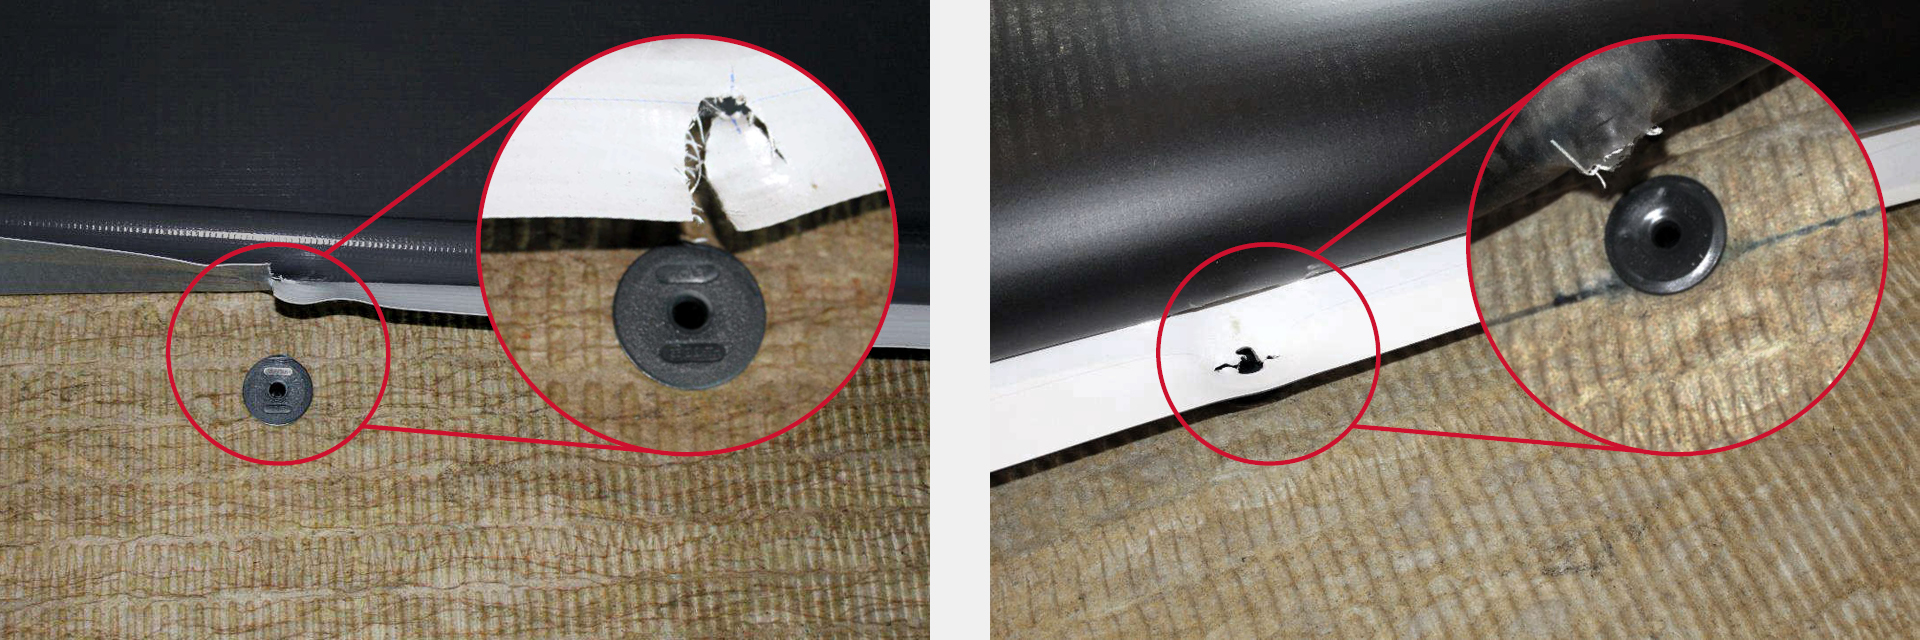
A szokásos meghibásodás szélszívás által a tetőfólia kiszakadása (bal odali kép) vagy az átgombolódás (jobb oldali kép). Ezek az összes meghibásodás körülbelül 90%-át teszik ki.Egy másik, de meglehetősen ritka meghibásodási minta a rögzítőelem kiszakadása az aljzatból. Itt kb. 8% körüli gyakoriságról beszélünk. Általában rendkívül erős tetőszigetelő lemezeknél fordul elő, és ez a szokásos meghibásodás a lineáris sínrögzítéseknél.
Nagyon ritka, de lehetséges a vízzáró lemez felszakadása a hegesztési varratnál. Ez általában a tetőfólia hegesztése során keletkező anyaghiba, vagy a tetőfólia belehelyezett szövetének anyaghibája.
A teszt végén a megrendelő jegyzőkönyvet kap. Ebben a vizsgálati jelentésben először a rendszer felépítését ismertetik, beleértve az összes egyedi komponenst, és az eredményt korrekciós tényezők és részleges biztonsági tényezők segítségével határozzuk meg. Ezután képek segítségével dokumentálják a tesztet és a hibát.
A vizsgálati jegyzőkönyvből adódó teherbíró képesség tervezési értéke - ez a gyártó ETA rendszerétől függően ismét egy bizonyos értékre csökkenthető - bekerül a szélterhelés számításába. Útmutatónk következő részében a DIN EN 1991-1-4 szabvány szerinti szélterheléssel foglalkozunk.


